Crosshair Overlay
A topmost custom crosshair drawn over the game. Useful when the game’s own crosshair is too small, too colorful for your monitor, or hidden by hipfire spread.
What it does
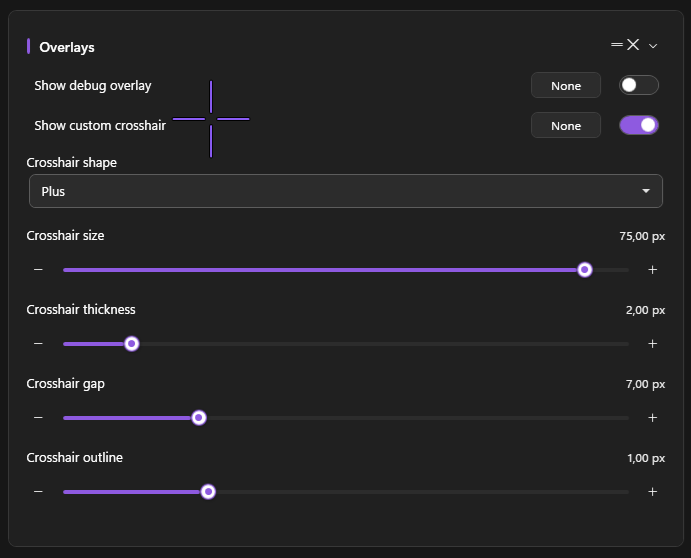
The crosshair overlay is a click-through, transparent WPF window painted at the centre of whatever PowerAim is currently capturing. It subscribes to ICapture.PropertyChanged and repositions live when the capture source changes — pick a different monitor or capture a specific process window from the title bar and the crosshair follows. It updates as you change shape / color / size on the Settings page.
How to enable
Settings → Overlays → Show Custom Crosshair
The crosshair appears immediately when you toggle it on. It survives alt-tab and stays on top of fullscreen games (using DXGI capture exclusion — see Hide UI from capture).
Configuration options
All settings live on the Overlays card in Settings.
| Setting | What it does | Default |
|---|---|---|
| Crosshair Shape | Dot / Cross / Plus / Circle / CircleDot / T | Plus |
| Crosshair Size | Total size in pixels (4–200) | 16 |
| Crosshair Thickness | Stroke width (1–12) | 2 |
| Crosshair Gap | Center gap for Plus / Cross (0–50) | 4 |
| Crosshair Outline | Outline thickness (0–6) — 0 disables the outline | 1 |
| Color | ARGB hex (set elsewhere via the color picker) | #FF8B5CF6 (PowerAim purple) |
| Outline Color | Outline ARGB hex | #FF000000 (black) |
| Detection Flash | Tint the crosshair with a configurable colour for N ms whenever the current frame has at least one detection — a quiet “detection is alive” cue without needing the debug overlay | Off |
| Detection Flash Color | ARGB hex of the flash tint | #FFFF3030 |
| Detection Flash Duration | Flash length in milliseconds (50–1000) | 200 |
The six shapes
- Dot — single filled circle at the center
- Cross —
+without a center gap - Plus —
+with a center gap (the default) - Circle — open ring
- CircleDot — open ring + center dot
- T — three-arm crosshair (omits the bottom)
Detection (ESP) overlay
Separate from the custom crosshair, the ESP card (Settings → Overlays) controls what PowerAim draws on the detected enemies themselves. Each toggle has its own global keybind:
| Toggle | What it draws |
|---|---|
Show Detected Player (ShowDetectedPlayer) |
The bounding box around each detected target — the master switch for the detection overlay |
Show Trigger Head Area (ShowTriggerHeadArea) |
The sub-rectangle the trigger / aim treats as the head |
Show AI Confidence (ShowAIConfidence) |
The model’s confidence score next to each box |
Show Tracers (ShowTracers) |
A line from the crosshair to each detection |
Show Sizes (ShowSizes) |
The box dimensions, as text (disabled for the WPF Canvas method) |
The look of those boxes is tunable on the same card:
| Setting | What it does | Range / Default |
|---|---|---|
Detected Player Color (DetectedPlayerColor) |
Box / overlay colour | Red |
AI Confidence Font Size (AIConfidenceFontSize) |
Confidence label text size | 1–30, default 20 |
Corner Radius (CornerRadius) |
Box corner rounding | 0–100, default 0 (square) |
Border Thickness (BorderThickness) |
Box border stroke width | 0.1–10, default 1 |
Overlay rendering backends
The ESP card has a Drawing Method dropdown (OverlayDrawingMethod) that picks how the detection overlay is painted. They trade off fidelity, performance, and capture-visibility:
| Method | How it draws |
|---|---|
WPF Canvas Overlay (WpfWindowCanvas) |
Canvas elements in a transparent WPF window. Default; Show Sizes is unavailable here. |
Media Drawing Context VisualHost (DrawingContextVisualHost) |
A retained-mode WPF DrawingContext visual host. |
Desktop Graphic Context GDI Draw (DesktopDC) |
GDI drawn straight onto the desktop device context — the fastest path. |
Overlay form GDI Context (OverlayFormGDI) |
GDI into a dedicated transparent overlay form. |
The Desktop-DC method draws directly on the desktop and is not hidden from screen capture. Selecting it pops a warning, and if Global Active is on with the detection overlay showing, PowerAim automatically turns Global Active off and tells you it did so “for safety” — because an unhidden overlay is exactly the kind of thing capture-analysis anti-cheat looks for. Use it carefully. The other three methods respect Hide UI from capture.
Tips
- Outline 1 with a dark outline color makes the crosshair readable over both light and dark backgrounds.
- Small Plus with a 4 px gap is the most “professional” look — visible but doesn’t cover the head.
- For RTS / strategy games, use Dot — keeps the crosshair tiny so you can see what you’re clicking.
Troubleshooting
- Crosshair appears off-center — PowerAim draws it at the centre of the capture area, which mirrors whatever monitor / window you selected as the capture source in the title bar. Confirm the capture source matches the game window.
- Game minimizes when I toggle it on — that’s the WPF window stealing focus. Re-focus the game manually. (We’re working on a fix.)
- Crosshair is captured by my recording software — disable Hide UI from Capture on the Settings page. (The opposite is the usual problem — the crosshair shouldn’t be visible to OBS by default.)